Do you want to create DIY projects, personalize Christmas ornaments, make your own shirts for Disney World, and have a Pinterest worthy party? Join me here https://www.facebook.com/groups/1146973478768004/, and together I will teach you what I have learned since I began my Silhouette Cameo journey almost 5 years ago! I remember how overwhelmed I was, and how it was hard to find help because the people who already knew didn’t want to teach me, fearing I would become their competition. I spent hours of my life learning how to install fonts, and work with glyphs, and researching the different types of vinyl and transfer tape, and on and on and on. Don’t become overwhelmed and quit, Join our Facebook group, and watch live videos of me creating right along with you. Every month we will complete projects together and you will learn tons. It’s going to be so much fun!
The best gifts for crafters and makers can be hard to find, and buying them a gift can be a little overwhelming, you know since they can make everything cute themselves, but with over 5 years of crafting experience, I am here to tell you what to buy a crafter for Christmas this year!
1. A Cutting Machine! Cutting machines allow crafters to cut with incredible accuracy 100s of different kinds of materials that they can use to create things like banners, decals for cars, wine glasses, wooden signs, labels for anything, custom shirts, stencils, fabric iron ons, teacher gifts, and on and on and on. The possibilities are literally endless, exciting, and within reach. If you want to give the gift that wows buy a cutting machine!
The most popular ones are the Silhouette Cameo 3, and the Cricut Maker this year. I personally own and love my SIlhouette Cameo 3. It can always be found on sale for $249.99-$269.99 and it comes in 3 colors white, black and the new pink color was just released in October. The Cricut Maker was released this year and runs $399.99 currently. There are tons of resources available to learn how to use a cutting machine online, and accessories make great stocking stuffers! Here’s a link to both for your convenience. The Cricut Maker has to have internet access to work, and can only cut vinyl up to 2 feet long at one time where as the Silhouette Cameo 3 can be used without internet, and can cut up to 10 feet long. Both machines allow you to create your own designs, or purchase designs from the programs on line library, however the Silhouette Cameo software has enhanced features that gives it an edge over Cricut, and more designs available for purchase in its library.. You can’t go wrong with either machine, however I am recommending the Silhouette Cameo 3 this holiday season based on my own personal experience! Here are links to both machines for your convenience. Just click the picture to check them out.
Silhouette Cameo 3 White Black and Pink all available with free shipping if you have Prime. Just click the image to order!
2. Cutting Machine Accessories also make great gifts for crafters. From cardstock, to vinyl, pens, tape, cutting mats, and blades, a crafters stocking and heart would overflow this year if you filled it with any of these items!
Great for Silhouette Cameo machine owners- An extra mat is always great to have on hand when one wears out, or you can keep one for glitter messy stuff, and one for everything else! The dust cover linked in the middle photo comes in several colors and keeps the machine clean and out of the way of little hands and furry animals if needed! The far right photo is the thing I have used the most! It upgraded my software to allow me to import .SVG files which I use all the time, and it allows me to import applique files into silhouette so I can cut out my fabric pieces, and it also enhanced tracing capabilities and several other things….just buy it, you won’t regret it!
Great for Fabric Loving Crafters: Anyone who lives with a fabric crafter knows they have special scissors, so it would make sense that there would be a fabric only blade for cutting machines. The blue one is for the Silhouette Cameo products. Heat and Bond is also a safe bet for Fabric lovers as they use it to attach fabric to stuff, and it makes it much easier to cut fabric with a cutting machine if you have this attached to the back. A small travel iron could save a crafters marriage, and is a great addition to a fabric lovers craft room. Has you ever went to iron clothes for work, and searched high and low for your iron? Spouses of crafters know what I’m talking about. No one wants to go upstairs at 6am, to hunt down the iron that may or may not have glitter stuck to the plate…do everyone a favor and buy this tiny little travel iron that can be stored in the craftroom, and the tabletop ironing board goes hand in hand with the iron. This one is awesome because it folds up and has a hook like a hanger, so you can store it in the craft room closet when not in use!
Great for Scrapbookers or Paper loving Crafters
This paper pack has great colors and would be awesome for a scrapbook or banner!
I use this Fiskars cutter weekly to trim cardstock, even cut vinyl rolls, make quick shapes, and to measure packages when I ship sometimes!
These are the replacement blades for the trimmer above. It’s always nice to have a back up so you never have to use a dull blade. Dull blades don’t go well with paper crafting!
Vinyl Lovers
A vinyl weeding tool allows you to remove the pieces of cut vinyl you don’t need when making decals, stencils or designs with a vinyl cutting machine like the SIlhouette Cameo 3 or Cricut Maker. This tool is life changing!
The scraper is used to rub the transfer tape over the vinyl to help you move the vinyl off of it’s paper backing when you’re ready.
This Ottlite Lightbox is awesome! Someone please send this to my husband! you put your vinyl on it and it lights up the lines so you can see the spots you need to clear out better!
This assorted vinyl pack would be perfect for someone just starting out! It has
10 7×12 sheets of Oracle 651 which can be used for car decals or cups, or labels,
3 sheets of 12×12 oracle 631 which would be used for wall decals, or signs. Oracle 651 is more permanent than 631, but both are removeable with enough elbow grease.
3 sheets of patterned Oracle vinyl which look cool as monograms on cups, or laptop decals, or notebooks
4 Sheets – 12 Inch x 15 Inch Siser Easyweed Heat Transfer
3 Sheets – 12 Inch x 20 Inch Siser Easyweed Glitter Heat Transfer
100% Genuine Oracal Vinyl and Siser Heat Transfer which is exactly what I used to make this stuff
Compatible with any Vinyl Cutter Including Cameo, Cricut, Brother!
Oracle 631 wall decal
Oracle 631 wooden sign
Decor
Oracle 631 used to stencil
Reclaimed Window
Oracle 631 Window Decal
Oracle 651 Matte Ornament
Oracle 651 Monogram Ring Dish
Oracle 651 Personalized Soccer Easter bucket
Siser Glitter Heat Transfer Vinyl and Printed HTV with Siser Glitter
Siser Easyweed
Sign Makers
This stencil vinyl on the far left is my favorite medium for making stencils for wooden signs. It’s not as sticky as regular Oracle 631 or 651, and it’s slightly transparent which makes lining it up on boards so much easier. In the middle mod podge has been used to seal off a stencil area before painting to help prevent bleeding, and it can also be used to seal a sign if needed. The far right features a sandpaper variety pack that will allow your sign maker to sand smooth, distress, and repair boo boos on wooden signs.
Shirt Makers
This variety starter pack of Heat transfer vinyl( will allow a shirt maker to create several shirts and try out lots of colors and textures for a great price! It includes 10 sheets!
Teflon sheets protect your project fom damaging your project, heat press, or iron when you are using heat to apply a heat transfer vinyl decal to a shirt! There are also great tutorials on using them to make your own pressing pillows!
A rhinestone kit from Silhouette studio is a fun edition to any shirt makers craft room! If your crafter loves bling and has a silhouette cameo, they will love this!
3. Heat Press and teflon sheet. This is for the crafter who loves all of the cute shirts with funny phrases, or wants to personalize shirts, dish towels, and bags for friends and family. Maybe they already have a cutting machine, and they’re ready to go to the next step. If you see your crafter trying to iron on decals on their hands and knees with a cookie sheet on the floor, please buy them a heat press! You will change their life! I started with a 15″ clam shell from Heat press nation. If you think she would ever want to make mugs or hats get a press that can grow with her future needs, or just get a clamshell! I have a 15′ clamshell like this one.
This one is an awesome bundle with great reviews, and would be great for a small business just starting out!
Teflon sheets are a must with a heat press. They protect the material you are pressing, and with 3 this size you can use one to make a pressing pillow! Don’t buy a heat press without a teflon sheet. That’s like giving a remote control car with no batteries!
4. Vinyl Starter Pack. I love purchasing my vinyl from Amazon, because they have great deals and free shipping with prime and they sell my favorite vinyl, Oracle and Siser. The starter packs are great for newbies to have lots of colors to play with. Order Oracle 651 for car decals, wine glass decals, and wooden signs, and Siser HTV(Heat Transfer Vinyl) for making shirts and other fabric craft things. I recommend Siser Stretch HTV for Baby Onesies and Ladies tops to account for the stretch in the chest of a fitted shirt.
Oracle 651 comes in tons of colors, but 63 sheets of colors would be sure to keep someone busy for a little while! This is great for decals on cars, glass, plastic, and wood. This amazing bundle has so many colors you can craft something for every holiday!
Click on the image to order with free shipping on Amazon Prime
Siser Glitter Heat Transfer Vinyl Perfect for shirts and other fabric!
Siser Stretch Bundle My favorite for Baby Onesies and stretchy clothing. This bundle has 20 colors. I’ve only used about 7!
Stencil Vinyl for making wooden signs and stencils. I was so happy when I switched to this for sign making! Cuts smooth on the silhouette, installs easily on wooden signs and is a little bit see through to help with placement. It’s not as sticky as Oracle 651, so it’s easier to lift and move if you need to.
5. Scrapbooking Pens with a scrapbook and a giftcard to have prints made, oh and glue dots…she wants them!
This super cute scrapbook will be perfect for her to capture all of the special memories you shared recently. Wrap it in a photo box with some glue dots and pens and some of your favorite photos and she will melt!
Glue dots are like magic! They hold pictures and notes and journaling cards on the pages! They would make a great stocking stuffer! These have great reviews and write so well on the black paper inside the scrapbook above!
Shutterfly prints https://www.shutterfly.com/prints
6. Scissors I love the Fiskars brand, they have a Lifetime warranty and I got mine easily replaced when I needed to swap them out under warranty with a simple phone call!
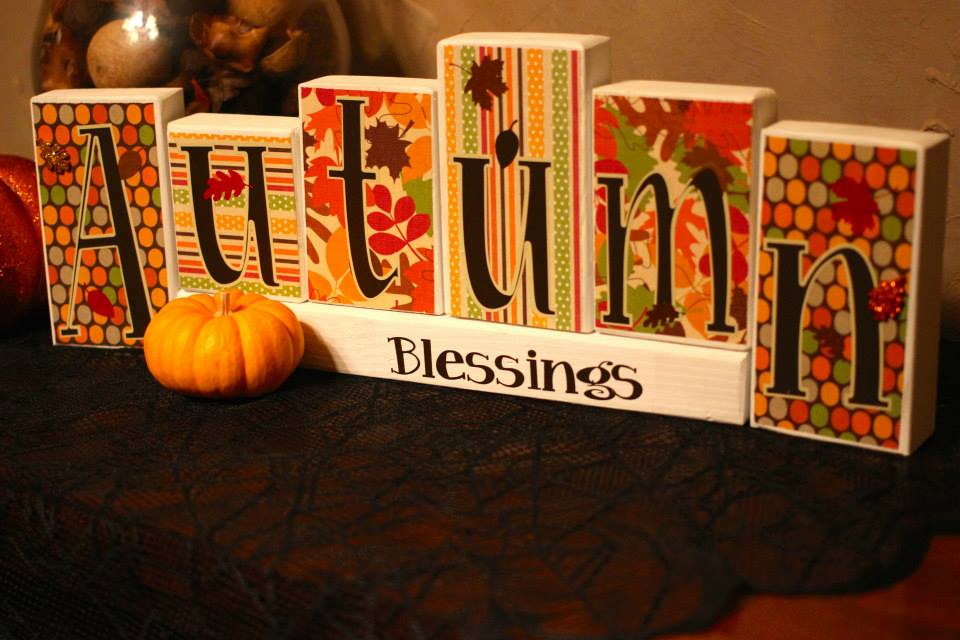
7. Glue If you learn how to say this correctly she will be super impressed. It’s a glue/sealer with a matte finish. Perfect for tons of DIY projects! Trust me, she’ll know what to do with it! I use it on wooden signs, block sets, stenciling, and to glitter things!
8. Wine glasses and armor etch to glass etch.
I like to purchase my wine glasses at Bed Bath and Beyond and use a 20% off coupon, which you can get a coupon here https://offers.bedbathandbeyond.com/SignupWidget/dynamic/BBBUS-email-printable-offers?acq_source=1212, or if you just need a couple you can purchase some at Target, or Dollar Tree. The armor etch is sold lots of places, but here’s a link to amazon for your convenience
9. Acrylic paints and brushes
Americana is my favorite brand of paints. Great coverage and dries fast!
This starter pack has their most popular colors and free shipping with Prime! I love amazon!!!
Foam brushes are a necessity!
10. The Xyron Creative Station. Makes stickers, laminates, turns things into magnets, and is gernally just amazing for scrapbookers, crafters, teachers, and me!. It comes preloaded with a cartridge, but if she wants to laminate or make magnets you’ll need to add the other cartridges, or you can pick them up for her birthday!
If she wants to laminate things for scrapbooking or kids crafts get her this cartridge too
Magnet Cartridge here turns pictures and artwork into Magnets
11. Gift Cards to her favorite place! These make great stocking stuffers, and will allow her to buy what she really wants! Hobby Lobby, Michaels, and JoAnne Fabrics are some of my favorite places.
12. Books about Crafting
Washi Tape Crafts…yes!!!!
Caligraphy always fascinated me, but my handwriting stinks! Might try this to see what I’m doing wrong!
Don’t forget the giftwrap! Buffalo plaid is so in this year!!!
and tape
and a bow
Happy Crafting,
Disclosure: This post contains affiliate links of products I use and love! Happy Crafting!
It’s been a few years since my first official craft fair, but I remember it like it was yesterday. Three weeks of my life were consumed with the layout of this 10 foot space I would inhabit for one day. Should I bring a tree, or a dresser, how many shelves do I need, what about tablecloth colors and bags, and lets not forget the most important question….what do I wear? I sat on the floor armed with a dry erase board and made a list of 50 different items I could create to take with me, and I slowly weeded things out and changed my game plan to focus on 2 products that had been hot sellers for me this season. Some People Are Worth Melting For ornaments and Santa-tizers. A week of sleeping 4 hours a night paid off and I was all boxed up and prepared for the trip to Dallas. I was determined to not mess up, and hopeful that I would sell all 100 items I had prepared for the big day. Joined with my 2 best friends, we set up like giddy school girls, and eyed our competition. Side note-vendor craft shows can quickly turn into an episode of Mean Girls, as all of the sleep deprived creative hopefuls see your merchandise as giant barricades of awesomeness that may very well prevent the future purchases on a creative entrepreneurs wishlist. Things like glitter, and washi tape, and trips to Disney World add up quick! The Scentsy lady down the hall was stressing because she had no power, and a beautiful display of shabby chic farmhouse decor had all of us jaw dropping, secretly wanting to be her! The moments before the doors opened and the first rush of customers came in was the absolute worst! I began to rethink my display, and my strategy, and even my outfit! The only thing keeping me grounded was the “cha ching” noise of my Etsy shop lighting up my phone. The huge rush of customers we had anticipated never showed, and I actually sold more on my Etsy Shop that day https://www.etsy.com/shop/WhimsyWillowCreation?ref=shop_sugg than I did at the craft fair. The other vendors, who I had prematurely labeled “the enemy”, became customers and friends. We all laughed together at the effort we had put in for such a low turn out, as we chowed down on the appetizers that were supposed to be for customers. It was a great learning experience, and I’m excited to be back in the groove and signed up for my first craft show in Katy, TX! It’s going to be a blast, and I hope to see you there!
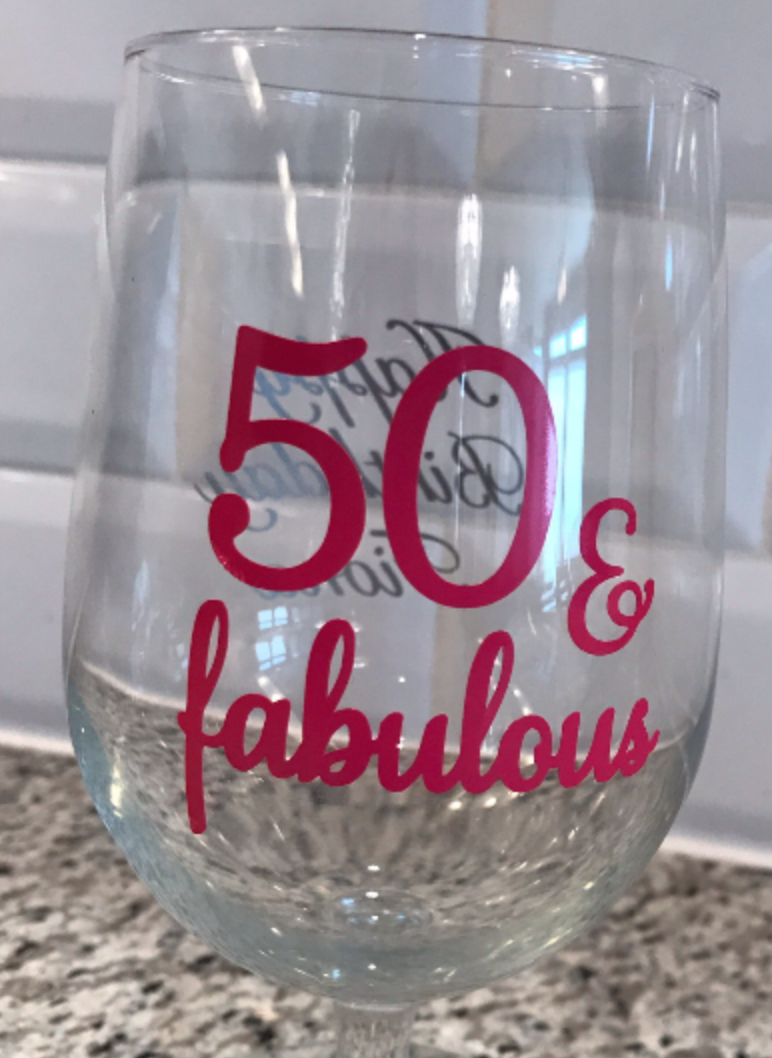
Here’s a quick video on how to install vinyl decals to wine glasses for a 50 & Fabulous party surprise, but the tutorial applies to all decal application.
First stop, you need wine glasses. If you don’t have time to go buy some, these have great reviews on amazon, and ship free with prime!
Next up you need rubbing alcohol and cotton balls or a paper towel to clean the glasses before you apply the decal! I also recommend you clean the glasses before you apply the decals so they are clean when you are ready to party….Nobody wants to drink from a dirty glass!
I use that font on Christmas ornaments, wedding stuff, and shirts. It is very pretty and comes with lots of variations to each letter so you can make lots of stuff! To get the decal on the glass I use contact paper. . I love contact paper for this application because it is transparent, and just sticky enough to pick up the decal, but it doesn’t leave a residue when you peel it away. Make sure you buy the stuff with the blue grid line backing like this one. The new one they came out with doesn’t work as well! I’m also including an affiliate link for the vinyl I use in case you want to make your own!
That’s it. That’s everything you need to make the magic happen! Open a bottle of wine or two, invite your best friends over, and knock out a set for the Birthday girl in no time!
Craft Happy,
Disclaimer I The links in this post pay me a small commission which I will be using to pay for my next Disney trip! #Disney2018
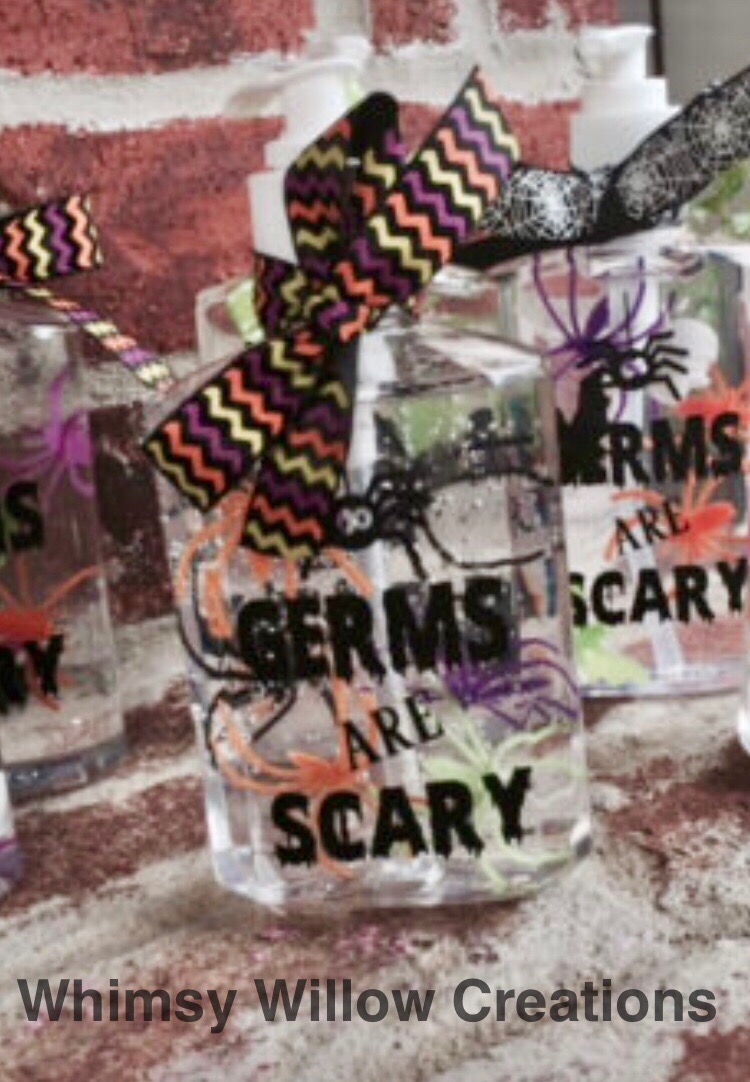
Here’s a quick Halloween DIY craft that will make everyone happy. Using Oracle 651 vinyl decals cut with a Silhouette Cameo 3, I cleaned up some hand sanitizer bottles, added some fun spiders, bats, and skulls, and created a super cute craft just in time for flu season! Here’s a link to my youtube video where I show you step by step how to make them, and links below to the supplies! Have fun and don’t forget to share your pics with me on my Facebook page https://www.facebook.com/WhimsyWillowCreations/
Supplies
Tie them off with a matching ribbon, and you are ready to share a spooky fun surprise! I usually buy my ribbon from Hobby Lobby on the weeks they have it 50% off in the sewing department, but the seasonal stuff is located at the front of the store if you want spider webs, or bats, or skulls on your ribbon. I like to make everything match.
You can use the same idea to make personalized hand sanitizers for classrooms, businesses, Christmas, Valentines and more! The possibilities are endless!
Happy Crafting!
Disclaimer: Some of the links in this post pay me a small commission, that I will use to pay for my next Disney trip, but they will help you make super cute sanitizers too!
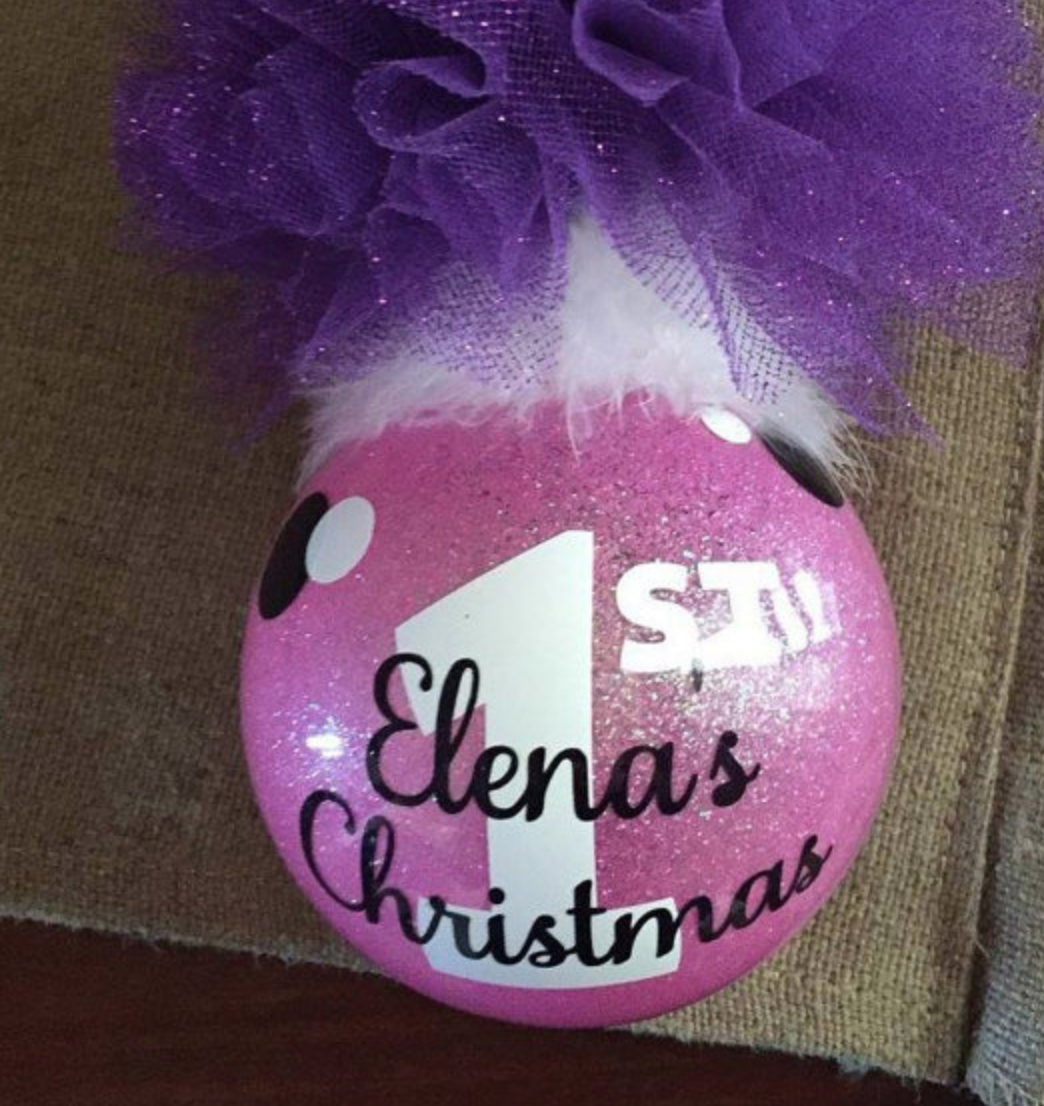
Are you ready for some DIY glitter ornament training? I fell in love with the glitter ornaments I saw popping up about 4 years ago, and I tried it and they have been one of my favorite things to make every year. They hold up great, and can be made in steps if you don’t have a ton of time to sit down from start to finish.
Supplies
Ornaments. I like to use glass ornaments for what I sell in my Etsy shop because they seem more premium, but plastic ones are great too, especially for kids. I buy the blank ornaments from Michaels or Hobby Lobby, but you can find them on Amazon too if you need them to be shipped.
Glitter It is whatI have used the last few years, and all of my ornaments are still beautiful!
Ultra Fine Glitter in your color choice. I buy mine from Hobby Lobby or Michaels, but this kit from Amazon looks amazing! So many colors!!!
Cups to hold ornaments while they dry. I use plastic solo cups
Tiny Funnel to pour in glitter
Vinyl cutting machine or decals to install on ornaments.
Transfer tape to transfer decal to ornament
Step 1: Remove cap from ornament and pour in some Glitter it. Slowly roll the ornament in a circular motion coating the entire durface of the inside of the ornament. Try not to shake it, and when you get to the opening of the ornament, go slow and gently pour the excess back into the glitter it bottle.
Step2:Grab your small funnel and pour in a few tablespoons of glitter. Remove the funnel and cover the opening with your palm and shake it up. Make sure you get the entire thing coated and add more glitter if you need to. and shake again.They should look like this.
Step 3: Pour the excess glitter back into the glitter container and turn the ornament upside down and place in a cup to dry. I like to leave mine overnight.
Step 4: Carefully put the top back on so you don’t scratch the inside.
Step 5:Add Vinyl decal. I love to use Oracle 631 or 651 with my Silhouette Cameo 3 to make the decals for the ornaments that I sell in my Etsy shop! I have found that using contact brand transfer tape works the best at getting the decal off the paper backing and onto the ornament. It is clear so you can see better to line things up, and it doesn’t leave a residue.
Here are some of my favorites!
If you plan to ship ornaments that you sell, I use this postal scale and these 5×5 boxes and bubble wrap to ship mine! Place some packing paper in the bottom put the ornament wrapped in 2 pieces of bubble wrap, and fill the top in with more paper. seal it up, weigh it and print your label out at home to avoid the lines at the post office. I use this DYMO label printer and it is amazing!
Happy Crafting,
Looking for Crafting fonts to put on your ornaments? Check Out these amazing ones! Just click the photo to see the full alphabet!
Disclaimer: Some links in this post are affiliate links that pay me a small commision if you place an order, which helps me maintain this blog!